Page 8 of 18
Re: Sonex Build Status and Completion Photos

Posted:
Mon May 21, 2012 9:39 pmby N111YX
Your craftsmanship looks great, Frank!
Re: Sonex Build Status and Completion Photos
Posted:
Sun Jul 29, 2012 8:31 pmby rizzz
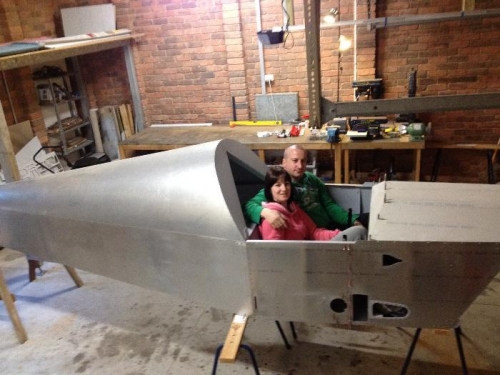
This afternoon I finally finished installing the seat, and yes, I finally sat in my airplane for the first time.
I put the control stick assembly and glare shield in place to make the experience more real and off course my wife Nathalie joined me while achieving this milestone.
I had my friend Greg come over to take the pictures (somebody needed to with Nat and I both in the plane), off course Greg tried it on as well.
I have been in a Sonex before so I know it's not the roomiest plane in the world but it's not that bad either, kind of like the 152 I learned to fly in.


- IMG_0132.jpg (58.12 KiB) Viewed 9556 times
Re: Sonex Build Status and Completion Photos
Posted:
Tue Jul 31, 2012 7:39 pmby 142YX
lookin' good! Hope the first sit gave your motivation tank a top-off!
Re: Sonex Build Status and Completion Photos
Posted:
Tue Jul 31, 2012 9:09 pmby rizzz
Sure did, there's no stopping me now!
I was surprised though at how much flex there is in that lowered seat, but I've read on many other builders sites that this is normal, one builder stated it's more of a hammock than a seat.
Quite comfortable though, even without the padding.
Re: Sonex Build Status and Completion Photos
Posted:
Tue Jul 31, 2012 9:45 pmby falvarez
Looks great Michael...I also just installed my seat and it also flexes some; however, I borrowed a fellow builder's Sonex upholstery kit (so I can figure out how to make my own) and tried it out in the plane...it makes a huge difference. The seat actually feels pretty solid with the upholstery on it.
Re: Sonex Build Status and Completion Photos
Posted:
Fri Aug 17, 2012 10:17 pmby Sonex1517
After life got in the way for months, new role at work, lots of travel, family stuff...I finally got back on track with Sonex 1517.
My father in law assisted me today clamping the top aft skin to the left wing so I can drill it up and cleco it tomorrow. Yay and sigh!
Sonex Build Status and Completion Photos
Posted:
Mon Sep 03, 2012 10:04 pmby Sonex1517
Today we completed putting the skin on the left wing. A few minor errors and I updrilled a few I should have waited - but overall I am really happy with the results.
The blue painters tape is to remind me NOT to updrill. I tend to make stupid errors when I have been working a long time, and this reminds me not to touch.
Robbie
Sonex 1517
Sent from my iPad using Tapatalk HD
Re: Sonex Build Status and Completion Photos
Posted:
Tue Sep 04, 2012 6:53 pmby chris
Looks good Robbie. The wings are coming right along. I like your painters tape idea.
Sonex Build Status and Completion Photos
Posted:
Sun Dec 23, 2012 10:59 amby Sonex1517
A few more shots from recent days work.
I have the left wing ribs riveted to the main and rear spar, the wiring and AOA hoses run, and the top aft wing skin clecoed back in place in preparation for riveting. I hope to complete reskinning the left wing today and begin riveting after Christmas.
For those working on their wings, I learned the hard way that you need to pay close attention to the root ribs when it is time to rivet. I literally riveted my way into a corner and could not easily reach several rivets on the forward root rib. After some creative thinking and a lot of bad language I eventually solved all but one rivet. That last rivet is simply ugly and it will bug me that it didn't come out right.
At that point I reminded myself of the words of Jack Dueck at the EAA workshop I attended years ago. I am not building a swiss watch.
One rivet does not make the wings fall off...but it bothers me.
Robbie
Sonex 1517
Sent from my iPad using Tapatalk HD
Sonex Build Status and Completion Photos
Posted:
Sun Dec 23, 2012 11:03 amby Sonex1517
Some shots of the duckworks landing light assembly and my wiring in the forward ribs.
At the end of the wing is a wire connection block that I may remove. Still not certain if I like it there, as using screw terminals means that there is a chance the screws could work loose leaving live voltage in the wing. I may just crimp the wires together and remove the block.
Robbie
Sonex 1517
Sent from my iPad using Tapatalk HD