


random user submitted photo
aileron installation
20 posts
• Page 1 of 2 • 1, 2
aileron installation
![]() by wingnut99 » Tue Mar 19, 2019 7:30 pm
by wingnut99 » Tue Mar 19, 2019 7:30 pm
I'm about to mount the lead on the aileron and wrap up everything but the wing tip since I'll probably wait to shop for lighting at Oshkosh. When I attach the weight to the arms my thought was to leave one side of the wing skin off so I can remove enough lead to get it to balance, at least pretty close without having to keep removing the aileron during the process. Is the goal to get the weight to cause the aileron to float in accordance with the description given on the plans? It shows a straight line off the top of the aileron surface to a point up the wing with a dimension above a location on the wing. Do the controls have to be attached inside the fuselage eventually to see if both ailerons are in balance when connected? Wingnut
- wingnut99
- Posts: 99
- Joined: Wed Nov 14, 2018 12:32 am
Re: aileron installation
![]() by mike.smith » Tue Mar 19, 2019 7:40 pm
by mike.smith » Tue Mar 19, 2019 7:40 pm
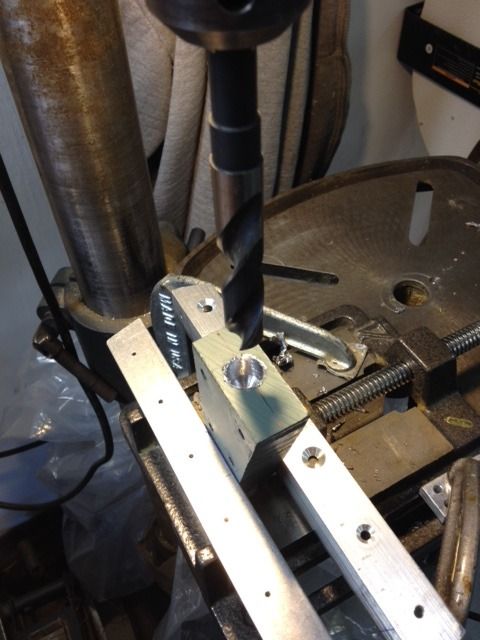
The balancing is done BEFORE you install it on the airplane. I put a long hinge pin through the hinge so that at least an inch was protruding from each end. Tied a piece of string to each end of that hinge pin, then found the balance/center point of the string hanging on my finger, with the aileron hanging just above my flat work bench. Now you can check the clearance per the plans and remove lead as required. I used a 1/2" dia. drill bit and drilled partial holes to remove material, staying away from the through-bolts.
See the detail on W-03, and note that if you are painting the aileron it should be painted BEFORE doing the balancing.
See the detail on W-03, and note that if you are painting the aileron it should be painted BEFORE doing the balancing.
Mike Smith
Sonex N439M
Scratch built, AeroVee, Dual stick, Tail dragger
http://www.mykitlog.com/mikesmith
Sonex N439M
Scratch built, AeroVee, Dual stick, Tail dragger
http://www.mykitlog.com/mikesmith
- mike.smith
- Posts: 1420
- Joined: Tue Jan 29, 2013 8:45 pm
Re: aileron installation
![]() by Bryan Cotton » Tue Mar 19, 2019 7:42 pm
by Bryan Cotton » Tue Mar 19, 2019 7:42 pm
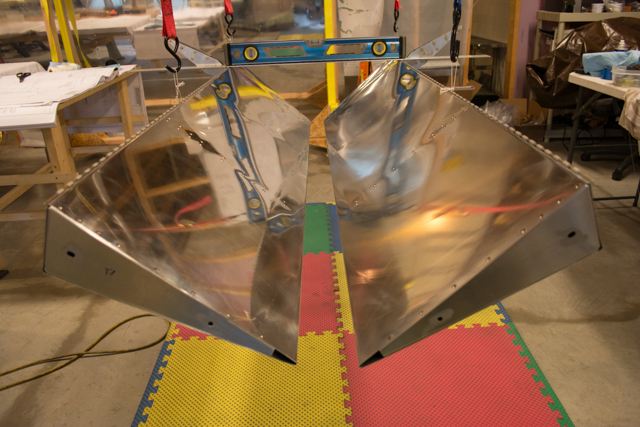
I did all my balancing off the wing as documented on this page of my thread:
viewtopic.php?f=39&t=578&start=550
With the acro ailerons you can't balance to 100%, i.e. aileron level. Instead you balance to make them the same. You should take lead out of the back side of the counterweight, as it will require more lead removal and therefore less weight.

Weight is the enemy.
viewtopic.php?f=39&t=578&start=550
With the acro ailerons you can't balance to 100%, i.e. aileron level. Instead you balance to make them the same. You should take lead out of the back side of the counterweight, as it will require more lead removal and therefore less weight.


Weight is the enemy.
Bryan Cotton
Poplar Grove, IL C77
Waiex 191 N191YX
Taildragger, Aerovee, acro ailerons
dual sticks with sport trainer controls
Prebuilt spars and machined angle kit
Year 2 flying and approaching 200 hours December 23
Poplar Grove, IL C77
Waiex 191 N191YX
Taildragger, Aerovee, acro ailerons
dual sticks with sport trainer controls
Prebuilt spars and machined angle kit
Year 2 flying and approaching 200 hours December 23
-

Bryan Cotton - Posts: 5206
- Joined: Mon Jul 01, 2013 9:54 pm
- Location: C77
Re: aileron installation
![]() by wingnut99 » Tue Mar 19, 2019 11:25 pm
by wingnut99 » Tue Mar 19, 2019 11:25 pm
I was noticing that drawing of a line coming up from the hinge Sunday while I was looking at the aileron detail. That seems pretty straight forward then. Just suspend the aileron by the hinge pin and remove lead from the thick end nearest the hinge so that you have to remove more to effect the balance than would be required on the far end. That makes sense. It looked like the weight would contact the upper and lower skin when the aileron is deflected in either direction. If so, is that a problem with it denting the skin outward? Thanks for the help everyone as always.
- wingnut99
- Posts: 99
- Joined: Wed Nov 14, 2018 12:32 am
Re: aileron installation
![]() by Bryan Cotton » Wed Mar 20, 2019 7:56 am
by Bryan Cotton » Wed Mar 20, 2019 7:56 am
My counterweights do not contact the skin when the controls are installed. It is close.
Bryan Cotton
Poplar Grove, IL C77
Waiex 191 N191YX
Taildragger, Aerovee, acro ailerons
dual sticks with sport trainer controls
Prebuilt spars and machined angle kit
Year 2 flying and approaching 200 hours December 23
Poplar Grove, IL C77
Waiex 191 N191YX
Taildragger, Aerovee, acro ailerons
dual sticks with sport trainer controls
Prebuilt spars and machined angle kit
Year 2 flying and approaching 200 hours December 23
-
Bryan Cotton - Posts: 5206
- Joined: Mon Jul 01, 2013 9:54 pm
- Location: C77
Re: aileron installation
![]() by Rynoth » Wed Mar 20, 2019 12:17 pm
by Rynoth » Wed Mar 20, 2019 12:17 pm
My aileron balancing:
http://www.rynoth.com/wordpress/waiex/2 ... -ailerons/
These were the aerobatic ailerons, which don't go level like the standard ailerons, I was simply trying to match them while removing as little material as possible for maximum counterweight. Turns out, I did a good job cutting the lead block and removed no lead whatsoever to achieve a matched result. I stuck a hinge pin in and used loops of kite string to attach them to ratchet straps to tune in level.
In my plane, the counterweights do indeed contact the bottom skin and end up being the limit on my aileron deflection, which I tend to prefer versus a stop somewhere else in the control system (i.e. max available deflection is possible.) I imagine while actually flying I will very rarely be at max deflection, especially with the extra roll authority of the aerobatic ailerons. The contact with the skin has a fairly large contact area though (the whole counterweight appears to contact the skin at the same time) and so far denting the lower skin while on the ground playing with the controls does not appear to be an issue. Upper skin contact is unlikely since the opposite aileron will contact the lower skin first, providing a stop.
Last edited by Rynoth on Wed Mar 20, 2019 12:31 pm, edited 1 time in total.
Ryan Roth
N197RR - Waiex #197 (Turbo Aerovee Taildragger)
Knoxville, TN (Hangar at KRKW)
My project blog: http://www.rynoth.com/wordpress/waiex/
Time-lapse video of my build: https://www.youtube.com/watch?v=Q8QTd2HoyAM
N197RR - Waiex #197 (Turbo Aerovee Taildragger)
Knoxville, TN (Hangar at KRKW)
My project blog: http://www.rynoth.com/wordpress/waiex/
Time-lapse video of my build: https://www.youtube.com/watch?v=Q8QTd2HoyAM
-

Rynoth - Posts: 1308
- Joined: Fri Jul 26, 2013 1:32 pm
- Location: Knoxville, TN
Re: aileron installation
![]() by Bryan Cotton » Wed Mar 20, 2019 12:31 pm
by Bryan Cotton » Wed Mar 20, 2019 12:31 pm
Turns out, I did a good job cutting the lead block and removed no lead whatsoever to achieve a matched result.
You keep rubbing that in! Of course I would have too, but my lead cutting Kung-Fu was weak.
Bryan Cotton
Poplar Grove, IL C77
Waiex 191 N191YX
Taildragger, Aerovee, acro ailerons
dual sticks with sport trainer controls
Prebuilt spars and machined angle kit
Year 2 flying and approaching 200 hours December 23
Poplar Grove, IL C77
Waiex 191 N191YX
Taildragger, Aerovee, acro ailerons
dual sticks with sport trainer controls
Prebuilt spars and machined angle kit
Year 2 flying and approaching 200 hours December 23
-
Bryan Cotton - Posts: 5206
- Joined: Mon Jul 01, 2013 9:54 pm
- Location: C77
Re: aileron installation
![]() by wingnut99 » Wed Mar 20, 2019 8:40 pm
by wingnut99 » Wed Mar 20, 2019 8:40 pm
Thanks for the pic. I'm not sure if my work is as art worthy as your's looks but I'm doing OK I think. About all I have left on this wing is to rivet it together and attach the tips but I don't have lights yet so that'll have to wait until Oshkosh. Do you think it would be safe to run wiring for the position lights so I could close the wing and free up the clecos. I suppose I need a hot and ground in 14 guage but I'm guessing.
- wingnut99
- Posts: 99
- Joined: Wed Nov 14, 2018 12:32 am
Re: aileron installation
![]() by Rynoth » Wed Mar 20, 2019 9:01 pm
by Rynoth » Wed Mar 20, 2019 9:01 pm
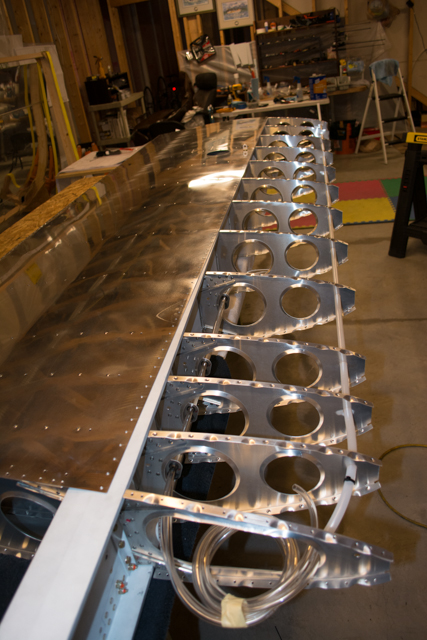
I didn't install lighting on my wingtips, but I did install conduit to make installing them later on an easy task:
http://www.rynoth.com/wordpress/waiex/2 ... ompletion/
If you're not sure the wiring requirement yet, doing conduit will still provide a safe/protected passage for whatever wires you do need to run in the future. I believe I used 1/2" diameter nylon(or some other plastic) water line from Home Depot, should stand up well to chafing and protect any wiring. I enlarged the tooling holes slightly to accommodate.
Last edited by Rynoth on Thu Mar 21, 2019 5:08 pm, edited 1 time in total.
Ryan Roth
N197RR - Waiex #197 (Turbo Aerovee Taildragger)
Knoxville, TN (Hangar at KRKW)
My project blog: http://www.rynoth.com/wordpress/waiex/
Time-lapse video of my build: https://www.youtube.com/watch?v=Q8QTd2HoyAM
N197RR - Waiex #197 (Turbo Aerovee Taildragger)
Knoxville, TN (Hangar at KRKW)
My project blog: http://www.rynoth.com/wordpress/waiex/
Time-lapse video of my build: https://www.youtube.com/watch?v=Q8QTd2HoyAM
-
Rynoth - Posts: 1308
- Joined: Fri Jul 26, 2013 1:32 pm
- Location: Knoxville, TN
Re: aileron installation
![]() by mike.smith » Wed Mar 20, 2019 10:42 pm
by mike.smith » Wed Mar 20, 2019 10:42 pm
wingnut99 wrote: Do you think it would be safe to run wiring for the position lights so I could close the wing and free up the clecos. I suppose I need a hot and ground in 14 guage but I'm guessing.
Absolutely. Running conduit is a good idea. Depending on the light fixture, and whether you will have two with a wig-wag effect, you may need anywhere from 2-4 wires. Put a pull string in the conduit so you can just pull the wires through later, rather than having to try to push them through. I always recommend you not use the aircraft structure as a ground, for anything. Run a dedicated ground wire instead, all the way to a common ground block. Bad grounds will ruin your day later on.
Mike Smith
Sonex N439M
Scratch built, AeroVee, Dual stick, Tail dragger
http://www.mykitlog.com/mikesmith
Sonex N439M
Scratch built, AeroVee, Dual stick, Tail dragger
http://www.mykitlog.com/mikesmith
- mike.smith
- Posts: 1420
- Joined: Tue Jan 29, 2013 8:45 pm
20 posts
• Page 1 of 2 • 1, 2
Who is online
Users browsing this forum: No registered users and 23 guests


